Nicole Sorochan for eBillity writes: Many of our customers find that when they connect Time Tracker to their QuickBooks PC or QuickBooks Online account, they can create a much more efficient time entry and billing process.
Time Tracker makes it easy for your employees to enter time from anywhere, including from their mobile devices, iPad, Outlook, and the Desktop Widget. An admin (usually the manager or a bookkeeper) then reviews and approves these entries in Time Tracker. Once you connect Time Tracker to QuickBooks, any approved entries automatically sync to QuickBooks for billing, and if enabled, payroll (optional). It works with QuickBooks PC or QuickBooks Online.
If you'd like to jump right in and start connecting Time Tracker to QuickBooks, here's a step-by-step guide.
Here's how it works.
Employees make entries in Time Tracker
Let's say you are a law firm. Your team uses Time Tracker to make their time entries. So one attorney might enter his hours at court with Time Tracker's free iPad app. Another attorney might enter her hours while working from home using Time Tracker's free Microsoft Outlook plugin.
The nice part is that when you connect Time Tracker to QuickBooks, your employees can enter time under your QuickBooks employee, customer, and service items.
If you use payroll and classes in QuickBooks those will be available too.
Timesheets from QuickBooks will also sync to Time Tracker. So any employees, customers, or service items you created in QuickBooks will appear automatically in Time Tracker.
This makes your billing administration much more efficient and saves you or your bookkeeper from having to manually enter time and billing descriptions at the end of the month.
Employees submit their time
At the end of the day, week, or month, employees can submit their time entries for approval. These entries are then sent automatically to the Time Tracker admin (usually the manager or bookkeeper).
The admin approves entries for billing in QuickBooks
All of these time entries will appear in the admin's central dashboard. The entries can be edited and approved.
Time Tracker will automatically sync the finalized entries to your QuickBooks PC or QuickBooks Online account for invoicing and payroll (payroll is optional and you can use the connection just for invoicing if you like).
You bill for time in QuickBooks
When you login to QuickBooks, you'll see all your approved entries waiting for you in QuickBooks' Weekly Timesheet. You can then create invoices from those entries. Do payroll, if you decide to enable this service. And pay any regular contractors.
Once connected, Time Tracker and QuickBooks will automatically sync with each other.
But what if I have data saved in QuickBooks?
Any data that you have in either Time Tracker or QuickBooks will be synced within a few minutes. Once you connect your accounts any existing employees, customers, classes, payroll, and service items will automatically appear in Time Tracker.
And if you create a NEW item to the above mentioned lists in QuickBooks—you and your employees can immediately enter time for those items in Time Tracker.
How to connect Time Tracker to QuickBooks for PC or QuickBooks Online
Connecting Time Tracker to QuickBooks only takes 5-10 minutes. You can request free help from a Time Tracker expert. Or do it yourself with this step-by-step article below:
Time Tracker and QuickBooks can work together!
Time Tracker makes it easy for your employees to enter time from anywhere, including from their mobile devices, iPad, Outlook, and the Desktop Widget. An admin (usually the manager or a bookkeeper) then reviews and approves employee entries in Time Tracker. Once you connect Time Tracker to QuickBooks, any approved entries automatically sync to QuickBooks for billing, and if enabled, payroll (optional). Works with QuickBooks PC or QuickBooks Online.
There is a $5 per month connection fee.
This article offers step-by-step instructions for how to sync Time Tracker to your QuickBooks PC or QuickBooks Online account.
The process is very easy, but if you get stuck our US-based support team can offer free personal help. Email <support@ebillity.com > or call us at 1-800-851-0992.
Step #1: Do you have QuickBooks PC or QuickBooks Online?
If you don't have QuickBooks, you'll need to sign up for it. You need to have an existing QuickBooks account to make Time Tracker work with QuickBooks. You canget QuickBooks here.
Step #2: Set-up the Intuit Sync Manager (for QuickBooks PC)
If you have QuickBooks PC, you'll need to set up your Intuit Sync Manager. QuickBooks Online customers have the Sync Manager automatically set-up and can skip to step 3.
Time Tracker and QuickBooks need to talk to each other. This is made possible through the Intuit Sync Manager. If you have never used this feature in QuickBooks PC, you'll need to set it up. If you don't, you won't be able to connect Time Tracker with QuickBooks PC.
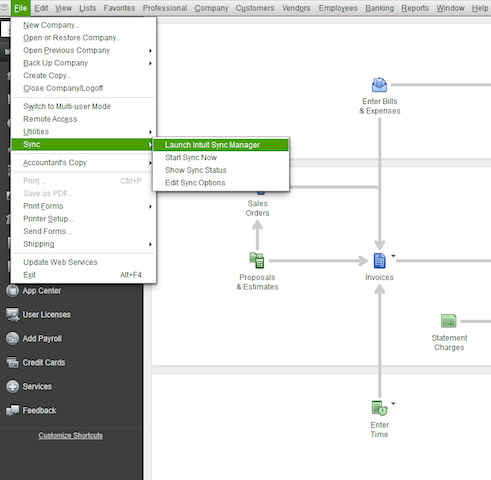
In QuickBooks 2013, click "File" and then "Launch Intuit Sync Manager."
If you are running an older version of QuickBooks, you can click on "online services" and then click "Set Up Intuit Sync Manager."
This is easy to set-up, but if you need more detail here is an article from Intuit to take you through the steps.
If you get stuck our US-based support team can offer personal help. Email or call us at 1-800-851-0992.
Step #3: Login to your Intuit Account
After you launch the Intuit Sync Manager you'll be asked to enter your Intuit user name and password.
If you don't have an Intuit account, you can create one free here (as shown below):
After you sign in or create your Intuit Account, just follow Intuit's prompts to finish the Sync Manager set up.
Step #4: Got QuickBooks and your Sync Manager?
We've set up the Intuit Sync Manager inside of QuickBooks. Now, we need to go into Time Tracker to finish the connection.
First, go to the QuickBooks Connection screen inside of the Time Tracker app. Just click Admin. Then click on Billing.
You'll then see the Connect to QuickBooks button. Check the box to activate the 5$ per month QuickBooks connection fee. Then click on the Connect to QuickBooks button.
Step #5: Follow the Connection Wizard
After you click the "Connect to QuickBooks" button, you will be asked to login to Intuit. Login using your Intuit password.
Choose the QuickBooks product you use—either QuickBooks PC or QuickBooks Online.
Finally, you'll see your Time Tracker account appear in the list. Select it!
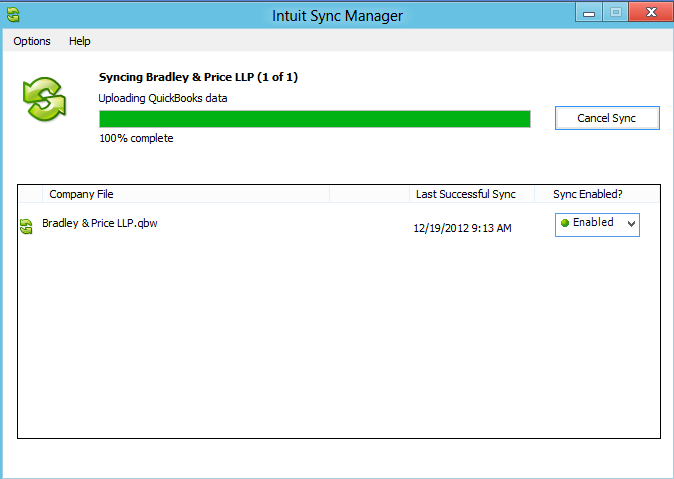
Step #5: Run the Sync Manager
Your final task is to run the Sync Manager. Open your QuickBooks account. Click on "File" and then click on "Sync." Then click on "Start Sync Now." In QuickBooks 2013, this appears as below.
Your Time Tracker and QuickBooks account will sync.
From now on, Time Tracker and QuickBooks will automatically sync. You don't even need to keep QuickBooks open in order for the Sync Manager to function. You can close QuickBooks when you are done and minimize the Sync Manager to your toolbar where it will continue to update your QuickBooks file automatically.
Step #6: Success!
You can now view your entries Excellent work! Now, you'll now see any approved Time Tracker entries in QuickBooks for simple billing and payroll (if you have payroll enabled). This means if an admin approves an employee's time entries, they will be sent to QuickBooks.
To view the entries you send from Time Tracker to QuickBooks, open up QuickBooks. Click on "Employees" and then "Enter Time."
Finally, click on "Use Weekly Timesheet." You'll now see your team's approved Time Tracker entries ready for billing and payroll in QuickBooks. Here's a helpful video explaining how to make time entries in Time Tracker and then approve and send those entries to QuickBooks.
Three final things to remember:
#1) You must approve time entries in Time Tracker before they appear in QuickBooks. This is the role of the admin. So have your team make time entries in Time Tracker. You—or any employee you make an admin—can approve them. After approval, they will be synced with QuickBooks.
#2) Time Tracker + QuickBooks will sync your data. If you have created service items and customers in Time Tracker prior to connecting with QuickBooks, don't worry. We will automatically create these for you in QuickBooks.
#3) Going forward, you now must create new customers and service items in QuickBooks, not Time Tracker. After you create new customers and service items in QuickBooks, they will automatically sync with Time Tracker.
0 comments:
Post a Comment